
| 일 | 월 | 화 | 수 | 목 | 금 | 토 |
|---|---|---|---|---|---|---|
| 1 | 2 | 3 | 4 | |||
| 5 | 6 | 7 | 8 | 9 | 10 | 11 |
| 12 | 13 | 14 | 15 | 16 | 17 | 18 |
| 19 | 20 | 21 | 22 | 23 | 24 | 25 |
| 26 | 27 | 28 | 29 | 30 | 31 |
- db
- mysql
- 스프링 부트
- Python
- Spring
- 장고
- node.js
- ORM
- python3
- HTTP
- 안드로이드
- Spring Boot
- JPA
- 보안
- 스프링
- 스프링부트
- 파이썬3
- java
- 자료구조
- 개발
- 데이터베이스
- 파이썬
- 자바
- 웹
- 웹 개발
- bytecode
- 디자인 패턴
- rabbitmq
- BCI
- django
- Today
- Total
semtax의 개발 일지
스프링부트 에서 카프카 써서 메시지 주고 받아보기 본문
개요
이번 포스팅에서는, 카프카가 무엇인지와 스프링에서 카프카를 사용하는 방법에 대해서 알아보도록 하겠습니다.
왜 메시지 큐를 쓰는가?
메시지 큐를 쓰는 이유는 대략적으로 아래와 같습니다.
먼저, 기존의 단순한 동기식 통신 방식에 비해서 더 뛰어난 응답속도를 보여줍니다.
기존의 동기식 통신 방식은, 사용자로 부터 요청을 받아서 요청을 다 처리할때 까지 Blocking 상태에 빠지게 됩니다.
즉, 요청이 전부 처리가 되어야 사용자에게 응답을 주게 됩니다.
하지만, 메시지 큐를 이용하는 경우 사용자에게 요청을 받으면 큐에다 집어 넣기만 하면 바로 다음 사용자의 요청을 받아들일 수 있기 때문에 응답속도가 향상되게 됩니다.
(실제 처리는 쌓여진 큐에서 다른 워커 프로세스가 1개씩 가져가서 처리하는 방식으로 이루어집니다.)
실제로, Node.js 와 같은 비동기 방식 아키텍처를 적용한 시스템과 같은 경우 내부적으로 이벤트 큐를 이용하여 비동기를 구현합니다.
또한, 메시지 큐를 이용해서 메시지를 주고 받을 수 있다는 사실과, 객체지향에서의 메서드 호출이 사실 다른 객체에게 해당 동작을 수행하라고 부탁하는 메시지를 보내는거라는 의미를 조합할 수 있습니다.
즉 요약하면, 메시지 큐를 이용해서 서로 다른 이기종/네트워크에 있는 서비스를 마치 함수호출 하듯이 사용 할 수 있습니다. (보통 이러한 방식을 보고 RPC 또는 RPI 방식 이라고 합니다.)
이러한 방식을 사용하면 각 기능간의 결합도를 낮출 수 있고, 이 말은 즉 모듈 간의 결합도를 줄일 수 있다는 의미입니다.
(심지어 각 기능을 서로 다른언어로 짜도 되고, 각 모듈을 서로 다른 서버에 배치할 수도 있습니다!)
그리고 이렇게 서비스의 결합을 분리해버리면, 모놀리틱 서비스(즉, 한 프로그램에 모든 기능이 전부 몰려있는 이전 방식)이 서비스가 죽으면 모든기능을 전부 쓰지 못하는데 반해, 위 방식처럼 서비스를 분리하면 한 서비스가 죽어도, 죽어버린 서비스 이외의 나머지 서비스는 동작을 하기때문에 서비스의 안정성이 올라가게 됩니다.
(사실은, 메시지큐를 관리해야 되는 이슈들 때문에 꼭 그렇지 만은 않습니다 ㅎㅎ...)
이렇게 메시지 큐를 잘 사용하면, 대규모 데이터를 처리하거나 응답속도가 중요한 서비스에서 많은 이점을 누릴 수 있습니다.
사실 이러한 메시지 큐 서비스의 종류는 상당히 다양하게 있습니다.
대표적으로, rabbitMQ 라는 서비스가 있고, 그 외에도 ZeroMQ, ActiveMQ 등의 많은 서비스가 있습니다.
그 중에서, 이번시간에 우리가 다룰 메시지 큐는 카프카 입니다.
카프카의 이점?
카프카가 다른 서비스 대비 이점이 무엇이 있을까요?
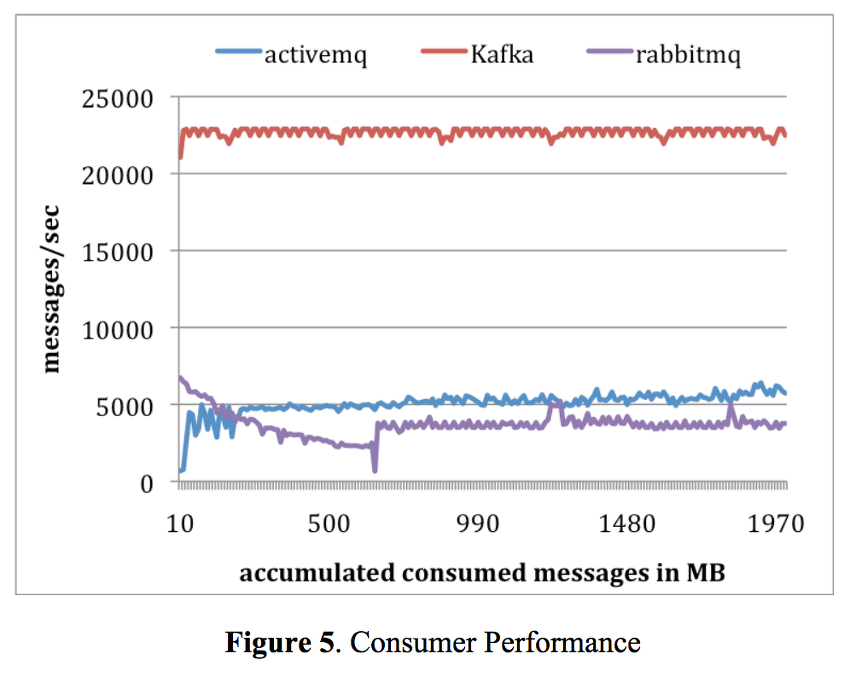
카프카의 장점은 아래와 같습니다.
- 다른 메시지 큐에 비해 실시간 로그 처리에 특화 되어있음
- 파일 시스템에 메시지를 저장함
- 데이터의 영속성이 보장됨
- Sequential 하게 읽고 쓰는 경우, 기존 메시지 큐와 속도차이가 비슷하거나 심지어 더 빠른경우도 있음
- 다른 메시지 큐에 비해 메시지 유실 위험이 적고, 에러 복구가 용이함
- 프로토콜이 다른 MQ에 비해서 간단하기 때문에 오버헤드가 적음
실제로 아래 그림과 같이 다른 MQ에 비해서 성능이 빠르다고 합니다...

그럼 실제로 스프링에서 카프카를 써보도록 하겠습니다.
예제
먼저, 카프카를 설치해줍니다.
맥(OS X) 환경 기준으로 아래와 같이 간편하게 설치 할 수 있습니다.
brew install kafka
그리고 아래 명령어를 이용해서 카프카 서비스를 띄워줍시다.
brew service kafka start
사실, 아래 명령어를 실행해서 카프카 메시지 큐의 토픽(메시지를 여기로 보내라는 일종의 우체통 같은거라고 생각하면 됩니다.)을 만들 수는 있습니다.
$ bin/kafka-topics.sh --create \
  --zookeeper localhost:2181 \
  --replication-factor 1 --partitions 1 \
  --topic mytopic
하지만, 뒤에서 설명을 하겠지만, 코드를 이용해서도 토픽을 생성할 수 있습니다.
(보통 코드를 이용해서 토픽을 생성합니다...)
다음으로, Springboot initializer 또는 자기가 쓰고 있는 IDE를 이용해서 스프링 프로젝트를 만들어 줍시다.
그리고 pom.xml에 아래와 같이 추가해줍니다.
<?xml version="1.0" encoding="UTF-8"?>
<project xmlns="http://maven.apache.org/POM/4.0.0"
         xmlns:xsi="http://www.w3.org/2001/XMLSchema-instance"
         xsi:schemaLocation="http://maven.apache.org/POM/4.0.0 http://maven.apache.org/xsd/maven-4.0.0.xsd">
    <modelVersion>4.0.0</modelVersion>

    <groupId>com.example.kafkaexample</groupId>
    <artifactId>kafkaexample</artifactId>
    <version>1.0-SNAPSHOT</version>

    <parent>
        <groupId>org.springframework.boot</groupId>
        <artifactId>spring-boot-starter-parent</artifactId>
        <version>2.1.6.RELEASE</version>
    </parent>

    <properties>
        <project.build.sourceEncoding>UTF-8</project.build.sourceEncoding>
        <project.build.outputEncoding>UTF-8</project.build.outputEncoding>
        <java.version>1.8</java.version>
    </properties>


    <dependencies>
        <dependency>
            <groupId>org.springframework.boot</groupId>
            <artifactId>spring-boot-starter</artifactId>
            <version>2.2.5.RELEASE</version>
        </dependency>
        <dependency>
            <groupId>org.springframework.kafka</groupId>
            <artifactId>spring-kafka</artifactId>
            <version>2.2.7.RELEASE</version>
        </dependency>
        <dependency>
            <groupId>com.fasterxml.jackson.core</groupId>
            <artifactId>jackson-databind</artifactId>
        </dependency>
    </dependencies>

</project>
다음으로, kafka의 설정 파일을 application.properties 파일에 아래와 같이 추가 해주자.
kafka.bootstrapAddress=localhost:9092
message.topic.name=mytopic
greeting.topic.name=greeting
filtered.topic.name=filtered
partitioned.topic.name=partitioned
다음으로, 아래와 같이 Kafka의 Topic에 관한 설정을 해준다.
package com.example.kafkaexample.config;


import org.apache.kafka.clients.admin.AdminClientConfig;
import org.apache.kafka.clients.admin.NewTopic;
import org.apache.kafka.common.internals.Topic;
import org.springframework.beans.factory.annotation.Value;
import org.springframework.context.annotation.Bean;
import org.springframework.context.annotation.Configuration;
import org.springframework.kafka.core.KafkaAdmin;

import java.util.HashMap;
import java.util.Map;

@Configuration
public class KafkaTopicConfig {

    @Value(value = "${kafka.bootstrapAddress}")
    private String bootstrapAddress;

    @Value(value = "${message.topic.name}")
    private String topicName;

    @Value(value = "${partitioned.topic.name}")
    private String partionedTopicName;

    @Value(value = "${filtered.topic.name}")
    private String filteredTopicName;

    @Value(value = "${greeting.topic.name}")
    private String greetingTopicName;

    @Bean
    public KafkaAdmin kafkaAdmin() {
        Map<String, Object> configs = new HashMap<>();
        configs.put(AdminClientConfig.BOOTSTRAP_SERVERS_CONFIG, bootstrapAddress);
        return new KafkaAdmin(configs);
    }

    @Bean
    public NewTopic topic1() {
        return new NewTopic(topicName,1,(short)1);
    }

    @Bean
    public NewTopic topic2() {
        return new NewTopic(partionedTopicName, 6, (short) 1);
    }

    @Bean
    public NewTopic topic3() {
        return new NewTopic(filteredTopicName, 1, (short) 1);
    }

    @Bean
    public NewTopic topic4() {
        return new NewTopic(greetingTopicName, 1, (short) 1);
    }
}
Kafka-Spring 에서는 위의 코드를 통해서, 코드를 이용해서 프로그래밍 적으로 메시지 큐의 토픽을 생성 할 수 있습니다.
스프링 부트(Kafka-Spring)에서는, 위와 같이 토픽을 생성해주는 함수를 만들고 Bean으로 등록해주면 자동으로 토픽을 생성해서 주입해줍니다.
또한, KafkaAdmin 타입의 생성자를 만들어서, 카프카의 설정정보도 주입이 가능합니다.
그리고 나서, 실제로 메시지를 발행하는 Producer에 관한 설정을 아래 코드와 같이 해줍시다.
package com.example.kafkaexample.config;


import com.example.kafkaexample.Greeting;
import org.apache.kafka.clients.producer.ProducerConfig;
import org.apache.kafka.common.serialization.StringSerializer;
import org.springframework.beans.factory.annotation.Value;
import org.springframework.context.annotation.Bean;
import org.springframework.context.annotation.Configuration;
import org.springframework.kafka.core.DefaultKafkaProducerFactory;
import org.springframework.kafka.core.KafkaTemplate;
import org.springframework.kafka.core.ProducerFactory;
import org.springframework.kafka.support.serializer.JsonSerializer;

import java.util.HashMap;
import java.util.Map;

@Configuration
public class KafkaProducerConfig {

    @Value(value = "${kafka.bootstrapAddress}")
    private String bootstrapAddress;

    @Bean
    public ProducerFactory<String, String> producerFactory() {
        Map<String, Object> configProps = new HashMap<>();
        configProps.put(
            ProducerConfig.BOOTSTRAP_SERVERS_CONFIG,
            bootstrapAddress
        );
        configProps.put(
            ProducerConfig.KEY_SERIALIZER_CLASS_CONFIG,
            StringSerializer.class
        );
        configProps.put(
            ProducerConfig.VALUE_SERIALIZER_CLASS_CONFIG,
            StringSerializer.class
        );

        return new DefaultKafkaProducerFactory<>(configProps);
    }

    @Bean
    public KafkaTemplate<String, String> kafkaTemplate() {
        return new KafkaTemplate<String, String>(producerFactory());
    }

    public ProducerFactory<String, Greeting> greetingProducerFactory() {
        Map<String, Object> configProps = new HashMap<>();
        configProps.put(ProducerConfig.BOOTSTRAP_SERVERS_CONFIG, bootstrapAddress);
        configProps.put(ProducerConfig.KEY_SERIALIZER_CLASS_CONFIG, StringSerializer.class);
        configProps.put(ProducerConfig.VALUE_SERIALIZER_CLASS_CONFIG, JsonSerializer.class);
        return new DefaultKafkaProducerFactory<>(configProps);
    }

    @Bean
    public KafkaTemplate<String, Greeting> greetingKafkaTemplate() {
        return new KafkaTemplate<>(greetingProducerFactory());
    }
}
먼저, ProducerFactory 객체를 이용해서 각 메시지 종류별로, 메시지를 어디에 보내고, 어떠한 방식으로 처리할것인지를 설정해줍니다. 그리고 카프카에서, 실제 메시지는 KafkaTemplate 이라는 객체에 담겨서 보내지게 됩니다.
(일종의 편지봉투 라고 보시면 됩니다.)
만약 소켓프로그래밍에 익숙하다면, Producer 객체는 소켓 디스크립터고, ProducerFactory는 소켓 디스크립터를 만들어주는 팩토리 메서드 라고 이해하면 편할겁니다.
위의 예제에서는, 2가지 종류의 메시지를 정의 하였습니다.
(즉, 2가지 종류의 편지봉투를 만들었다고 보시면 됩니다.)
다음으로, 실제로 메시지를 가져오는 부분인 Consumer에 대한 코드를 아래와 같이 작성 해줍니다.
package com.example.kafkaexample.config;


import com.example.kafkaexample.Greeting;
import org.springframework.kafka.support.serializer.JsonDeserializer;
import org.apache.kafka.clients.consumer.ConsumerConfig;
import org.apache.kafka.common.serialization.StringDeserializer;
import org.springframework.beans.factory.annotation.Value;
import org.springframework.context.annotation.Bean;
import org.springframework.context.annotation.Configuration;
import org.springframework.kafka.annotation.EnableKafka;
import org.springframework.kafka.config.ConcurrentKafkaListenerContainerFactory;
import org.springframework.kafka.core.ConsumerFactory;
import org.springframework.kafka.core.DefaultKafkaConsumerFactory;

import java.util.HashMap;
import java.util.Map;

@EnableKafka
@Configuration
public class KafkaConsumerConfig {

    @Value(value = "${kafka.bootstrapAddress}")
    private String bootstrapAddress;

    public ConsumerFactory<String, String> consumerFactory(String groupId){
        Map<String, Object> props = new HashMap<>();
        props.put(ConsumerConfig.BOOTSTRAP_SERVERS_CONFIG, bootstrapAddress);
        props.put(ConsumerConfig.GROUP_ID_CONFIG, groupId);
        props.put(ConsumerConfig.KEY_DESERIALIZER_CLASS_CONFIG, StringDeserializer.class);
        props.put(ConsumerConfig.VALUE_DESERIALIZER_CLASS_CONFIG, StringDeserializer.class);
        return new DefaultKafkaConsumerFactory<>(props);
    }

    public ConcurrentKafkaListenerContainerFactory<String, String> kafkaListenerContainerFactory(String groupId) {
        ConcurrentKafkaListenerContainerFactory<String, String> factory = new ConcurrentKafkaListenerContainerFactory<>();
        factory.setConsumerFactory(consumerFactory(groupId));
        return factory;
    }

    @Bean
    public ConcurrentKafkaListenerContainerFactory<String, String> fooKafkaListenerContainerFactory() {
        return kafkaListenerContainerFactory("foo");
    }

    @Bean
    public ConcurrentKafkaListenerContainerFactory<String, String> barKafkaListenerContainerFactory() {
        return kafkaListenerContainerFactory("bar");
    }

    @Bean
    public ConcurrentKafkaListenerContainerFactory<String, String> headersKafkaListenerContainerFactory() {
        return kafkaListenerContainerFactory("headers");
    }

    @Bean
    public ConcurrentKafkaListenerContainerFactory<String, String> partitionsKafkaListenerContainerFactory() {
        return kafkaListenerContainerFactory("partitions");
    }

    @Bean
    public ConcurrentKafkaListenerContainerFactory<String,String> filterKafkaListenerContainerFactory() {
        ConcurrentKafkaListenerContainerFactory<String, String> factory = kafkaListenerContainerFactory("filter");
        factory.setRecordFilterStrategy(record -> record.value().contains("world"));
        return factory;
    }


    public ConsumerFactory<String, Greeting> greetingConsumerFactory() {
        Map<String, Object> props = new HashMap<>();
        props.put(ConsumerConfig.BOOTSTRAP_SERVERS_CONFIG, bootstrapAddress);
        props.put(ConsumerConfig.GROUP_ID_CONFIG, "greeting");
        return new DefaultKafkaConsumerFactory<>(props, new StringDeserializer(), new JsonDeserializer<>(Greeting.class));
    }

    @Bean
    public ConcurrentKafkaListenerContainerFactory<String, Greeting> greetingKafkaListenerContainerFactory() {
        ConcurrentKafkaListenerContainerFactory<String, Greeting> factory = new ConcurrentKafkaListenerContainerFactory<String, Greeting>();
        factory.setConsumerFactory(greetingConsumerFactory());
        return factory;
    }

}
위의, Producer 부분과 유사하게 ConsumerFactory 객체를 이용해서 각 메시지 종류별로, 메시지를 어디에서 받고, 어떠한 방식으로 처리할것인지를 설정 해줍니다.
그리고 위의 예제에서, Consumer와 같은 경우, 위에서 설정한 각 Topic 별로 메시지를 어디서/어떻게 받을지를 설정해주는 메서드들을 지정하였습니다.
마지막으로, 위에서 작성한 설정을 기반으로 아래와 같이 메시지 큐에 데이터를 넣고 빼보도록 합시다.
package com.example.kafkaexample;

import org.springframework.beans.factory.annotation.Autowired;
import org.springframework.beans.factory.annotation.Value;
import org.springframework.boot.SpringApplication;
import org.springframework.boot.autoconfigure.SpringBootApplication;
import org.springframework.context.ConfigurableApplicationContext;
import org.springframework.context.annotation.Bean;
import org.springframework.kafka.annotation.KafkaListener;
import org.springframework.kafka.annotation.TopicPartition;
import org.springframework.kafka.core.KafkaTemplate;
import org.springframework.kafka.support.KafkaHeaders;
import org.springframework.kafka.support.SendResult;
import org.springframework.messaging.handler.annotation.Header;
import org.springframework.messaging.handler.annotation.Payload;
import org.springframework.util.concurrent.ListenableFuture;
import org.springframework.util.concurrent.ListenableFutureCallback;

import java.util.concurrent.CountDownLatch;
import java.util.concurrent.TimeUnit;

@SpringBootApplication
public class KafkaExampleApplication {
    public static void main(String[] args) throws Exception {
        ConfigurableApplicationContext context = SpringApplication.run(KafkaExampleApplication.class, args);

        MessageProducer producer = context.getBean(MessageProducer.class);
        MessageListener listener = context.getBean(MessageListener.class);

        producer.sendMessage("Hello, World!");
        listener.latch.await(10, TimeUnit.SECONDS);


        for (int i = 0; i < 5; i++) {
            producer.sendMessageToPartion("Hello To Partioned Topic!", i);
        }
        listener.partitionLatch.await(10, TimeUnit.SECONDS);


        producer.sendMessageToFiltered("Hello Baeldung!");
        producer.sendMessageToFiltered("Hello World!");
        listener.filterLatch.await(10, TimeUnit.SECONDS);


        producer.sendGreetingMessage(new Greeting("Greetings", "World!"));
        listener.greetingLatch.await(10, TimeUnit.SECONDS);

        context.close();
    }

    @Bean
    public MessageProducer messageProducer() {
        return new MessageProducer();
    }

    @Bean
    public MessageListener messageListener() {
        return new MessageListener();
    }

    public static class MessageProducer {

        @Autowired
        private KafkaTemplate<String, String> kafkaTemplate;

        @Autowired
        private KafkaTemplate<String, Greeting> greetingKafkaTemplate;

        @Value(value = "${message.topic.name}")
        private String topicName;

        @Value(value = "${partitioned.topic.name}")
        private String partionedTopicName;

        @Value(value = "${filtered.topic.name}")
        private String filteredTopicName;

        @Value(value = "${greeting.topic.name}")
        private String greetingTopicName;

        public void sendMessage(String message) {

            ListenableFuture<SendResult<String, String>> future = kafkaTemplate.send(topicName, message);

            future.addCallback(new ListenableFutureCallback<SendResult<String, String>>() {

                @Override
                public void onSuccess(SendResult<String, String> result) {
                    System.out.println("Sent message=[" + message + "] with offset=[" + result.getRecordMetadata()
                            .offset() + "]");
                }

                @Override
                public void onFailure(Throwable ex) {
                    System.out.println("Unable to send message=[" + message + "] due to : " + ex.getMessage());
                }
            });
        }

        public void sendMessageToPartion(String message, int partition) {
            kafkaTemplate.send(partionedTopicName, partition, null, message);
        }

        public void sendMessageToFiltered(String message) {
            kafkaTemplate.send(filteredTopicName, message);
        }

        public void sendGreetingMessage(Greeting greeting) {
            greetingKafkaTemplate.send(greetingTopicName, greeting);
        }
    }

    public static class MessageListener {

        private CountDownLatch latch = new CountDownLatch(3);

        private CountDownLatch partitionLatch = new CountDownLatch(2);

        private CountDownLatch filterLatch = new CountDownLatch(2);

        private CountDownLatch greetingLatch = new CountDownLatch(1);

        @KafkaListener(topics = "${message.topic.name}", groupId = "foo", containerFactory = "fooKafkaListenerContainerFactory")
        public void listenGroupFoo(String message) {
            System.out.println("Received Messasge in group 'foo': " + message);
            latch.countDown();
        }

        @KafkaListener(topics = "${message.topic.name}", groupId = "bar", containerFactory = "barKafkaListenerContainerFactory")
        public void listenGroupBar(String message) {
            System.out.println("Received Messasge in group 'bar': " + message);
            latch.countDown();
        }

        @KafkaListener(topics = "${message.topic.name}", containerFactory = "headersKafkaListenerContainerFactory")
        public void listenWithHeaders(@Payload String message, @Header(KafkaHeaders.RECEIVED_PARTITION_ID) int partition) {
            System.out.println("Received Messasge: " + message + " from partition: " + partition);
            latch.countDown();
        }

        @KafkaListener(topicPartitions = @TopicPartition(topic = "${partitioned.topic.name}", partitions = { "0", "3" }), containerFactory = "partitionsKafkaListenerContainerFactory")
        public void listenToParition(@Payload String message, @Header(KafkaHeaders.RECEIVED_PARTITION_ID) int partition) {
            System.out.println("Received Message: " + message + " from partition: " + partition);
            this.partitionLatch.countDown();
        }

        @KafkaListener(topics = "${filtered.topic.name}", containerFactory = "filterKafkaListenerContainerFactory")
        public void listenWithFilter(String message) {
            System.out.println("Recieved Message in filtered listener: " + message);
            this.filterLatch.countDown();
        }

        @KafkaListener(topics = "${greeting.topic.name}", containerFactory = "greetingKafkaListenerContainerFactory")
        public void greetingListener(Greeting greeting) {
            System.out.println("Recieved greeting message: " + greeting);
            this.greetingLatch.countDown();
        }

    }
}
코드의 양이 많으니 하나씩 뜯어서 보도록 합시다.
먼저, 메시지를 생성하는 부분입니다.
public static class MessageProducer {

  @Autowired
  private KafkaTemplate<String, String> kafkaTemplate;

  @Autowired
  private KafkaTemplate<String, Greeting> greetingKafkaTemplate;

  @Value(value = "${message.topic.name}")
  private String topicName;

  @Value(value = "${partitioned.topic.name}")
  private String partitionedTopicName;

  @Value(value = "${filtered.topic.name}")
  private String filteredTopicName;

  @Value(value = "${greeting.topic.name}")
  private String greetingTopicName;

  public void sendMessage(String message) {

    ListenableFuture<SendResult<String, String>> future = kafkaTemplate.send(topicName, message);

    future.addCallback(new ListenableFutureCallback<SendResult<String, String>>() {

      @Override
      public void onSuccess(SendResult<String, String> result) {
        System.out.println("Sent message=[" + message + "] with offset=[" + result.getRecordMetadata()
                           .offset() + "]");
      }

      @Override
      public void onFailure(Throwable ex) {
        System.out.println("Unable to send message=[" + message + "] due to : " + ex.getMessage());
      }
    });
  }

  public void sendMessageToPartion(String message, int partition) {
    kafkaTemplate.send(partitionedTopicName, partition, null, message);
  }

  public void sendMessageToFiltered(String message) {
    kafkaTemplate.send(filteredTopicName, message);
  }

  public void sendGreetingMessage(Greeting greeting) {
    greetingKafkaTemplate.send(greetingTopicName, greeting);
  }
}
먼저, 2가지 종류의 KafkaTemplate을 정의하였습니다.
(해당 KafkaTemplate 들은 위에서 만든 KafkaProducerConfig에 있는 빈 객체가 대입되게 됩니다.)
다음으로, kafkaTemplate를 이용해서 메시지를 전송합니다. 사실 메시지 큐 방식으로 통신하는 경우 필연적으로 비동기 방식으로 통신하기 때문에(메시지가 언제올지 알 수가 없으므로..) 콜백 함수를 등록하게 됩니다.
(여담으로 rabbitMQ도 그렇지만 보통 메시지 큐에서는 저렇게 요청-응답 을 쌍으로 받으려면 보통 수신 큐, 송신 큐 2개를 둬서 통신을 하게 됩니다. 이러한 임시 큐들을 카프카와 같은 메시지 브로커 서비스에서 자동으로 만들어주게 됩니다.)
다음으로, 메시지를 받는 부분입니다.
public static class MessageListener {

  private CountDownLatch latch = new CountDownLatch(3);

  private CountDownLatch partitionLatch = new CountDownLatch(2);

  private CountDownLatch filterLatch = new CountDownLatch(2);

  private CountDownLatch greetingLatch = new CountDownLatch(1);

  @KafkaListener(topics = "${message.topic.name}", groupId = "foo", containerFactory = "fooKafkaListenerContainerFactory")
  public void listenGroupFoo(String message) {
    System.out.println("Received Messasge in group 'foo': " + message);
    latch.countDown();
  }

  @KafkaListener(topics = "${message.topic.name}", groupId = "bar", containerFactory = "barKafkaListenerContainerFactory")
  public void listenGroupBar(String message) {
    System.out.println("Received Messasge in group 'bar': " + message);
    latch.countDown();
  }

  @KafkaListener(topics = "${message.topic.name}", containerFactory = "headersKafkaListenerContainerFactory")
  public void listenWithHeaders(@Payload String message, @Header(KafkaHeaders.RECEIVED_PARTITION_ID) int partition) {
    System.out.println("Received Messasge: " + message + " from partition: " + partition);
    latch.countDown();
  }

  @KafkaListener(topicPartitions = @TopicPartition(topic = "${partitioned.topic.name}", partitions = { "0", "3" }), containerFactory = "partitionsKafkaListenerContainerFactory")
  public void listenToParition(@Payload String message, @Header(KafkaHeaders.RECEIVED_PARTITION_ID) int partition) {
    System.out.println("Received Message: " + message + " from partition: " + partition);
    this.partitionLatch.countDown();
  }

  @KafkaListener(topics = "${filtered.topic.name}", containerFactory = "filterKafkaListenerContainerFactory")
  public void listenWithFilter(String message) {
    System.out.println("Recieved Message in filtered listener: " + message);
    this.filterLatch.countDown();
  }

  @KafkaListener(topics = "${greeting.topic.name}", containerFactory = "greetingKafkaListenerContainerFactory")
  public void greetingListener(Greeting greeting) {
    System.out.println("Recieved greeting message: " + greeting);
    this.greetingLatch.countDown();
  }

}
먼저, 어떠한 Topic의 메시지를 어떠한 방식으로 받을지를 @KafkaListener를 이용해서 지정해줍니다.
그리고, KafkaListener를 통해서 특정 파티션의 메시지를 받거나 특정 그룹의 메시지를 받거나 하는등의 설정도 가능합니다.
그리고, Consumer와 같은 경우, 병렬로 메시지를 처리하는 경우도 있기때문에, 동시접근으로 인한 Race Condition과 같은 경우를 막기 위해서 CountDownLatch 라는 함수를 이용해서 접근을 제한하게 됩니다.
(일종의 세마포어라고 보시면 됩니다.)
마지막으로 위에서 정의한 수신/송신 부분을 실제로 사용하는 곳입니다.
public class KafkaExampleApplication {
    public static void main(String[] args) throws Exception {
        ConfigurableApplicationContext context = SpringApplication.run(KafkaExampleApplication.class, args);

        MessageProducer producer = context.getBean(MessageProducer.class);
        MessageListener listener = context.getBean(MessageListener.class);

        producer.sendMessage("Hello, World!");
        listener.latch.await(10, TimeUnit.SECONDS);


        for (int i = 0; i < 5; i++) {
            producer.sendMessageToPartion("Hello To Partioned Topic!", i);
        }
        listener.partitionLatch.await(10, TimeUnit.SECONDS);


        producer.sendMessageToFiltered("Hello Baeldung!");
        producer.sendMessageToFiltered("Hello World!");
        listener.filterLatch.await(10, TimeUnit.SECONDS);


        producer.sendGreetingMessage(new Greeting("Greetings", "World!"));
        listener.greetingLatch.await(10, TimeUnit.SECONDS);

        context.close();
    }

  ...
}
실제로 실행해보면 아래와 같이 메시지를 주고받는것을 알 수 있습니다.
Sent message=[Hello, World!] with offset=[1]
Received Messasge in group 'bar': Hello, World!
Received Messasge in group 'foo': Hello, World!
Received Messasge: Hello, World! from partition: 0
Received Message: Hello To Partioned Topic! from partition: 0
Received Message: Hello To Partioned Topic! from partition: 3
Recieved Message in filtered listener: Hello Baeldung!
Recieved Message in filtered listener: Hello World!
출처
'개발 > Java' 카테고리의 다른 글
| 디자인패턴 공부내용 정리 : 싱글톤 패턴 (0) | 2020.05.16 |
|---|---|
| 디자인패턴 공부내용 정리 : 빌더 패턴 (0) | 2020.05.16 |
| 자바 Uncaught Exception 캐치 하기 (0) | 2020.05.05 |
| 스프링부트로 게시판 만들기 12(完) : API 문서 생성 자동화 (0) | 2020.05.02 |
| 스프링부트로 게시판 만들기 11 : 파일 업로드/다운로드 구현 (1) | 2020.05.02 |
