
| 일 | 월 | 화 | 수 | 목 | 금 | 토 |
|---|---|---|---|---|---|---|
| 1 | 2 | 3 | 4 | |||
| 5 | 6 | 7 | 8 | 9 | 10 | 11 |
| 12 | 13 | 14 | 15 | 16 | 17 | 18 |
| 19 | 20 | 21 | 22 | 23 | 24 | 25 |
| 26 | 27 | 28 | 29 | 30 | 31 |
- 자료구조
- Spring Boot
- 스프링 부트
- 자바
- BCI
- 웹
- Spring
- django
- 파이썬
- 웹 개발
- python3
- bytecode
- rabbitmq
- 스프링
- 디자인 패턴
- 개발
- 장고
- mysql
- 안드로이드
- 데이터베이스
- Python
- 보안
- HTTP
- db
- JPA
- 스프링부트
- ORM
- 파이썬3
- node.js
- java
- Today
- Total
semtax의 개발 일지
스프링부트로 게시판 만들기 4 : JPA 매핑 기능을 이용해 댓글 기능 추가하기 본문
스프링부트로 게시판 만들기 4 : JPA 매핑 기능을 이용해 댓글 기능 추가하기
semtax 2020. 2. 26. 01:12개요
이번 포스팅에서는, JPA를 이용해서 기존 예제에 댓글기능을 추가하는것을 다루려고 한다.
먼저, JPA를 이용해서 댓글 기능을 추가하기전에 기본적으로 알아야 할 내용들을 짚어보고 가도록 하자.
데이터 베이스 Relationship
보통 프로젝트를 수행하면서, 데이터를 DB에 넣기 좋게 모델링을 할때 E-R 다이어그램을 사용해서 모델링을 해보았을 것이다.
혹은 학교 데이터 베이스 수업때, E-R 다이어 그램을 이용해서 모델링을 해 보았을 것이다.
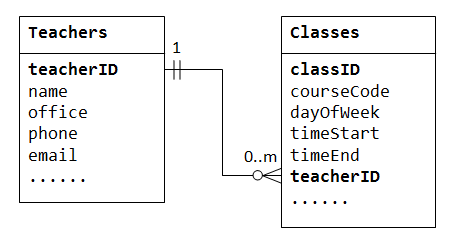
모델링을 하다 보면 아래와 같은 형태의 다이어그램을 많이 그리거나 보았을 것이다.

위의 그림에서, Course나 Instructor와 같은 사각형을 보고 엔티티(Entity)라고 부르고,
마름모 모양 과 닭발 같이 생긴 선을 보고 관계(Relationship)이라고 부른다.
보통 이러한 엔티티와의 관계를 모델링 하다 보면 아래와 같이 보통 4가지 형태중의 하나로 구분되게 된다.
| 관계 종류 |
| 1:1 |
| 1:N |
| N:1 |
| N:M |
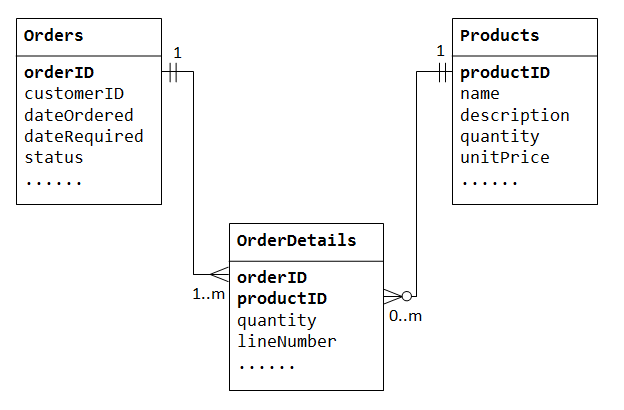
위와 같이 E-R 다이어그램으로 나타낸 논리적 모델을 실제로 DB에 넣기 위해 물리적 모델로 다시 설계를 해보면,
아래와 같이 외래키를 사용한 형태나, 외래키 간의 매핑 테이블을 두는 형태로 설계가 된다.
물론 위에 있는 테이블을 그대로 객체로 옮길수도 있겠지만, 그렇게 되면 객체지향적 프로그래밍이 아닌,
데이터베이스 구조에 끌려다니는 프로그래밍 방식이 되어버린다.
즉, 객체나 자바 컬렉션을 읽고 쓰듯이 데이터베이스를 다룰 수 없는 것이다.
JPA 와 같은 ORM 프레임워크 에서는 이러한 데이터베이스와 객체간의 불일치를 해결해주고,
사용자가 이러한 점을 신경쓰지 않아도 상당부분을 알아서 처리를 해주게 된다.
이제, JPA를 이용해서 이러한 관계를 어떻게 다루는지(JPA가 객체를 어떻게 테이블로 매핑하는지) 한번 확인 해보자.
JPA에서의 Relationship 구현
JPA에서 1:N, M:1 과 같은 관계를 매핑 하는법은 아래와 같다.
@Entity
public class Post {

    @Id @GeneratedValue
    @Column(name = "post_id")
    private Long Id;

    private String title;
    private String content;
    private String writer;

    ...
}

@Entity
public class Comment {

    @Id @GeneratedValue
    @Column(name = "comment_id")
    private Long Id;

    private String title;
    private String content;

    private String writer;

    @ManyToOne
    @JoinColumn(name = "post_id")
    private Post post;

    ...
}
위 코드와 같이, @ManyToOne 어노테이션을 붙여주고, @JoinColumn 어노테이션을 이용해서 매핑의 대상이 되는 반대편 객체의 키 값을 적어주면 된다.
또한, 관계(Relationship)의 방향이 따로 없는 테이블과는 다르게 JPA는 사실 내부적으로 포인터(레퍼런스)의 형태를 띄고 있기 때문에 매핑 방향이 정해져 있다.
보통 위와 같은 방식을 보고, 단방향 매핑이라고 하고 JPA에서는 이러한 단방향 매핑 이외에도 양방향 매핑이라는것을 지원한다.
(양방향 매핑은 추후 포스팅에서 다루도록 하겠다.)
JPA를 이용해서 이렇게 매핑 해놓으면, 실제 코드에서는 마치 객체를 읽고 쓰는 것처럼, 테이블에 접근하는게 가능해지게 된다.
예시
아래 예시는 @ManyToOne 을 이용해서 N:1 매핑을 만들어서 댓글 기능을 구현하는 예제이다.
게시물의 Entity 구조는 아래와 같다.
@Entity
public class Post {

    @Id @GeneratedValue
    @Column(name = "post_id")
    private Long Id;

    private String title;
    private String content;

    private String writer;


    public Long getId() {
        return Id;
    }

    public void setId(Long id) {
        Id = id;
    }

    public String getTitle() {
        return title;
    }

    public void setTitle(String title) {
        this.title = title;
    }

    public String getContent() {
        return content;
    }

    public void setContent(String content) {
        this.content = content;
    }

    public String getWriter() { return writer; }

    public void setWriter(String writer) { this.writer = writer; }

    @Override
    public boolean equals(Object o) {
        if (this == o) return true;
        if (o == null || getClass() != o.getClass()) return false;
        Post post = (Post) o;
        return Objects.equals(Id, post.Id) &&
                Objects.equals(title, post.title) &&
                Objects.equals(content, post.content) &&
                Objects.equals(writer, post.writer);
    }

    @Override
    public int hashCode() {
        return Objects.hash(Id, title, content, writer);
    }
}
댓글의 Entity 구조는 아래와 같다.
@Entity
public class Comment {

    @Id @GeneratedValue
    @Column(name = "comment_id")
    private Long Id;

    private String title;
    private String content;

    private String writer;

    @ManyToOne
    @JoinColumn(name = "post_id")
    private Post post;

    public Long getId() {
        return Id;
    }

    public void setId(Long id) {
        Id = id;
    }

    public String getTitle() {
        return title;
    }

    public void setTitle(String title) {
        this.title = title;
    }

    public String getContent() {
        return content;
    }

    public void setContent(String content) {
        this.content = content;
    }

    public String getWriter() {
        return writer;
    }

    public void setWriter(String writer) {
        this.writer = writer;
    }

    public Post getPost() {
        return post;
    }

    public void setPost(Post post) {
        this.post = post;
    }

    @Override
    public boolean equals(Object o) {
        if (this == o) return true;
        if (o == null || getClass() != o.getClass()) return false;
        Comment comment = (Comment) o;
        return Objects.equals(Id, comment.Id) &&
                Objects.equals(title, comment.title) &&
                Objects.equals(content, comment.content) &&
                Objects.equals(writer, comment.writer);
    }

    @Override
    public int hashCode() {
        return Objects.hash(Id, title, content, writer);
    }
}
다음으로 JPA Repository를 아래와 같이 선언해주자.
import com.semtax.application.entity.Post;
import org.springframework.data.jpa.repository.JpaRepository;

public interface PostRepository extends JpaRepository<Post,Long> {
}
마지막으로 아래 코드 처럼 Repository를 사용할 컨트롤러를 작성 해주자.
@RestController
public class CommentController {

    @Autowired
    PostRepository postRepository;

    @Autowired
    CommentRepository commentRepository;

    @CrossOrigin(origins = "*", allowedHeaders = "*")
    @GetMapping("/post/{id}/comment")
    public List<Comment> getPostComments(@PathVariable Long id){
        Post post = postRepository.findById(id).get();
        return commentRepository.findCommentsByPost(post);
    }

    // DTO 쓰세요 ㅠㅠ.., 아니면 N:1 매핑만 하던가..
    @CrossOrigin(origins = "*", allowedHeaders = "*")
    @PutMapping("/post/{id}/comment")
    public Comment createComment(@PathVariable Long id, @RequestBody Comment comment){
        Optional<Post> postItem = postRepository.findById(id);
        comment.setPost(postItem.get());
        commentRepository.save(comment);
        return comment;
    }

    @CrossOrigin(origins = "*", allowedHeaders = "*")
    @PostMapping("/post/{id}/comment/{commentID}")
    public Comment updateComment(@PathVariable Long id,@PathVariable Long commentID, @RequestBody Comment comment){
        Optional<Post> postItem = postRepository.findById(id);
        comment.setPost(postItem.get());
        Comment newComment = commentRepository.findById(commentID).get();
        newComment.setTitle(comment.getTitle());
        newComment.setContent(comment.getContent());
        newComment.setWriter(comment.getWriter());
        return newComment;
    }

    @CrossOrigin(origins = "*", allowedHeaders = "*")
    @DeleteMapping("/post/{id}/comment/{commentID}")
    public String deleteComment(@PathVariable Long id, @PathVariable Long commentID){
        commentRepository.deleteById(commentID);
        return "Comment Delete Success!";
    }
}
결과 화면 및 결론
Postman으로 테스트 해보면 결과는 다음과 같다.


이렇게 해서 댓글기능 까지 구현이 완료되었다.
하지만, 뭔가 만족스럽지 못하다.
아직, 회원 가입이나, 로그인 기능도 없고. 컨트롤러에 여러가지 책임이 몰려있어서 코드가 좀 많이 더럽다.
그리고, 컨트롤러에 너무많은 코드가 몰려있어서 계층간 구조도 뭔가 제대로 나누어지지 않은 느낌이다.
앞으로의 포스팅을 통해 차츰차츰 개선해 나가도록 하자.
출처
'개발 > Java' 카테고리의 다른 글
| 스프링부트로 게시판 만들기 6 : 로그인 기능 추가 (4) | 2020.05.01 |
|---|---|
| 스프링부트로 게시판 만들기 5 : 회원가입 기능 추가 (0) | 2020.05.01 |
| 스프링부트로 게시판 만들기 3 : 스프링 예외처리 (2) | 2020.01.23 |
| 자바 및 스프링에 관한 여러가지 정보들이 있는 사이트 (0) | 2020.01.23 |
| 스프링부트로 게시판 만들기 2 : 스프링 부트 와 JPA 연동 (0) | 2020.01.23 |


