semtax의 개발 일지
3. expressjs 에서 Postgre SQL 연동하기 본문
소개
이번 시간에는, expressjs에서 postgreSQL을 연동하는 방법을 알아보도록 하겠습니다.
postgreSQL은, Oracle이나 MySQL과 비슷한 RDBMS입니다. 메이저한 RDBMS중 가장 실험적인 기능을 많이 제공하는것으로 알려져 있습니다.
사실, node.js에서는 MongoDB를 가장 많이 사용하기는 하지만, RDBMS도 많이 사용을 하고 있습니다.
또한, 이미 MongoDB관련된 포스팅은 많은데다가 postgreSQL을 연동한 예제는 잘 보이지 않는것 같아서 작성을 하게 되었습니다.
설치 및 연동방법
아래 명령어를 이용해서 node.js용 postgreSQL 모듈을 설치 합니다.
npm install pg-promise아래 코드와 같은 방식으로 사용하면 됩니다.
const pgp = require("pg-promise")();
const db = pgp('postgres://testdb:testdb@localhost:5432/testdb');

db.one('SELECT $1 AS value', 123)
    .then(function (data){
        console.log('DATA:', data.value);
    })
    .catch(function (error) {
        console.log('ERROR:', error);
    });
더 자세한 내용은 공식 도큐멘트(http://vitaly-t.github.io/pg-promise/)를 참조 하시면 됩니다.
예제
이번 포스팅에서 진행할 예제는, 간단히 메모를 등록하고 읽고, 수정하고 삭제하는 예제입니다.
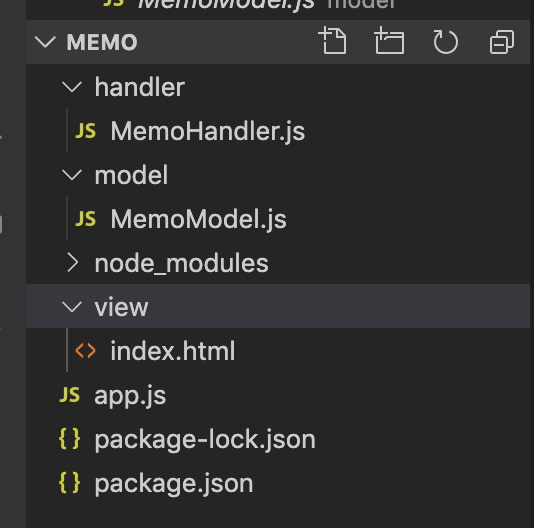
이번 예제의 프로젝트 구조는 아래 그림과 같습니다.

각 폴더별 역할은 아래와 같습니다.
| 폴더명 | 역할 |
|---|---|
| model | 데이터를 어떠한 식으로 주고받는지를 정의하는 코드들을 모아놓은 폴더입니다. |
| handler | 실제 서비스의 규칙을 명세해놓은 코드들을 모아놓은 폴더입니다. |
| View | 화면을 그리는 방법을 결정하는 코드들을 모아놓은 폴더입니다. |
뭐하러 한 파일에 모든 코드를 몰아넣지 않고 굳이 왜 저렇게 역할별로 쪼개 놓았냐고 질문을 할 수 있습니다.
하지만, 역할별로 코드를 쪼개지 않고 한 파일에 모든 코드를 몰아넣는 경우, 단순한 로직을 하나 바꾸는 경우에도 다른 연관된 모든 코드들을 바꿔줘야 하는 문제가 발생합니다. 코드의 크기가 작을때는 별로 상관이 없지만 코드의 크기가 커지는 경우 이는 큰 문제가 됩니다. 쓸모없는 시간을 소모하게 되는 것이지요.
보통 위와 같은 형태의 설계형태를 레이어드 아키텍처(Layered Architecture) 또는 N-tier 아키텍처라고도 부릅니다.
먼저, 데이터를 주고 받는 부분을 정의해놓은 memoModel.js 파일을 확인하도록 합시다.
const PgPromise = require("pg-promise")();

class MemoModel{
    constructor() {
        this.db = PgPromise("postgres://testdb:testdb@localhost:5432/testdb");
    }

    create(memo){
        let title = memo.title;
        let desc = memo.desc;

        return this.db.any('INSERT INTO memo(title, description) VALUES($1, $2) RETURNING id',[title, desc]);
    }

    readAll(){
        return this.db.any('SELECT * FROM memo');
    }

    read(id){
        return this.db.any('SELECT * FROM memo WHERE id = $1',[id]);
    }

    update(id, memo){
        let title = memo.title;
        let desc = memo.desc;

        return this.db.any("UPDATE memo SET title = $1, description = $2 WHERE id = $3 RETURNING id",[title, desc, id]);
    }

    delete(id){
        return this.db.any('DELETE FROM memo WHERE id = $1 RETURNING id',[id]);
    }
}

module.exports = MemoModel;
해당 코드에는, 각각 메모를 생성(Create), 수정(Update), 조회(Read, ReadAll), 삭제(Delete)를 하는 함수들이 존재합니다. node.js의 pg-promise와 같은 경우, any함수를 이용해서 쿼리를 실행 할 수 있으며, 코드에서 보는바와 같이 배열을 통해서 순차적으로 인자를 지정해서 넘겨줄 수 있습니다.
그리고, pg-promise는 비동기 모드로 실행이 되기 때문에 자바스크립트의 promise객체를 리턴하게 되고 이를 통해 핸들러에서 실행이 완료되었을때와 에러가 났을때의 콜백함수를 직접 지정해서 사용할 수 있습니다.
또한 postgreSQL에서는 데이터베이스 차원에서 RETURNING 키워드를 통해서 INSERT, UPDATE, DELETE를 수행하고 그 결과를 한번에 돌려받는 쿼리를 지원합니다.
다음으로, 위에서 선언한 모델을 실제로 사용하는 핸들러의 코드 입니다.
const MemoModel = require("../model/MemoModel");

class MemoHandler{

    constructor() {
        this.model = new MemoModel();
    }

    create(req, res){
        let memo = req.body;

        this.model.create(memo)
            .then(function(data){
                res.send(JSON.stringify(data));
            })
            .catch(function(error){
                res.send(JSON.stringify({msg : error}));
            });
    }

    read(req, res){
        let id = req.params.id;

        this.model.read(id)
            .then(function(data){
                res.send(JSON.stringify(data));
            })
            .catch(function(error){
                res.send(JSON.stringify({msg : error}));
            });
    }

    readAll(req, res){
        this.model.readAll()
            .then(function(data){
                res.send(JSON.stringify(data));
            })
            .catch(function(error){
                res.send(JSON.stringify({msg : error}));
            });
    }

    update(req, res, body){
        let id = req.params.id;
        let memo = req.body;

        this.model.update(id, memo)
            .then(function(data){
                res.send(JSON.stringify(data));
            })
            .catch(function(error){
                res.send(JSON.stringify({msg : error}));
            });
    }

    delete(req, res, body){
        let id = req.params.id;

        this.model.delete(id)
            .then(function(data){
                res.send(JSON.stringify(data));
            })
            .catch(function(error){
                res.send(JSON.stringify({msg : error}));
            });
    }
}

module.exports = MemoHandler;
해당 코드에는, 사용자가 메모를 생성(Create), 수정(Update), 조회(Read, ReadAll), 삭제(Delete)연산을 요청했을때의 핸들러 함수들을 나타냅니다. 모델에서 넘겨받은 promise객체를 이용해서 실행이 완료되었을때 결과값을 전송하는 부분과 에러가 났을때, 에러메시지를 전송하는 부분을 확인 할 수 있습니다.
마지막으로 app.js 코드 입니다.
const express = require("express");
const app = express();

const MemoHandler = require("./handler/MemoHandler");

const port = 3100;

const memoHandler = new MemoHandler();

// 4.16 이전 버전인 경우 body-parser 모듈 사용
app.use(express.json());

app.get("/memo", memoHandler.readAll.bind(memoHandler));
app.get("/memo/:id", memoHandler.read.bind(memoHandler));
app.put("/memo", memoHandler.create.bind(memoHandler));
app.post("/memo/:id", memoHandler.update.bind(memoHandler));
app.delete("/memo/:id", memoHandler.delete.bind(memoHandler));


app.listen(port, () => {
    console.log(`listen port : ${port}`);
});
해당 코드에서는 expressjs 와 관련된 설정을 해주고, 라우팅을 이용해 사용자가 URL에 접근하는 경우 그에 맞는 핸들러(함수)를 실행해주도록 핸들러를 지정해주는 역할을 수행합니다. 이때 모델과 핸들러가 클래스 형태로 되어있어서 this가 선언한 인스턴스에 바인딩 되어있지 않아서 bind함수를 이용해서 인스턴스를 바인딩 해줍니다.
테스트 해보기
위에서 만든 서비스가 제대로 동작하는지 postman을 켜서 동작을 확인해 보도록 하겠습니다.
자세한 내용은 https://semtax.tistory.com/16?category=826900 을 참조 바랍니다.
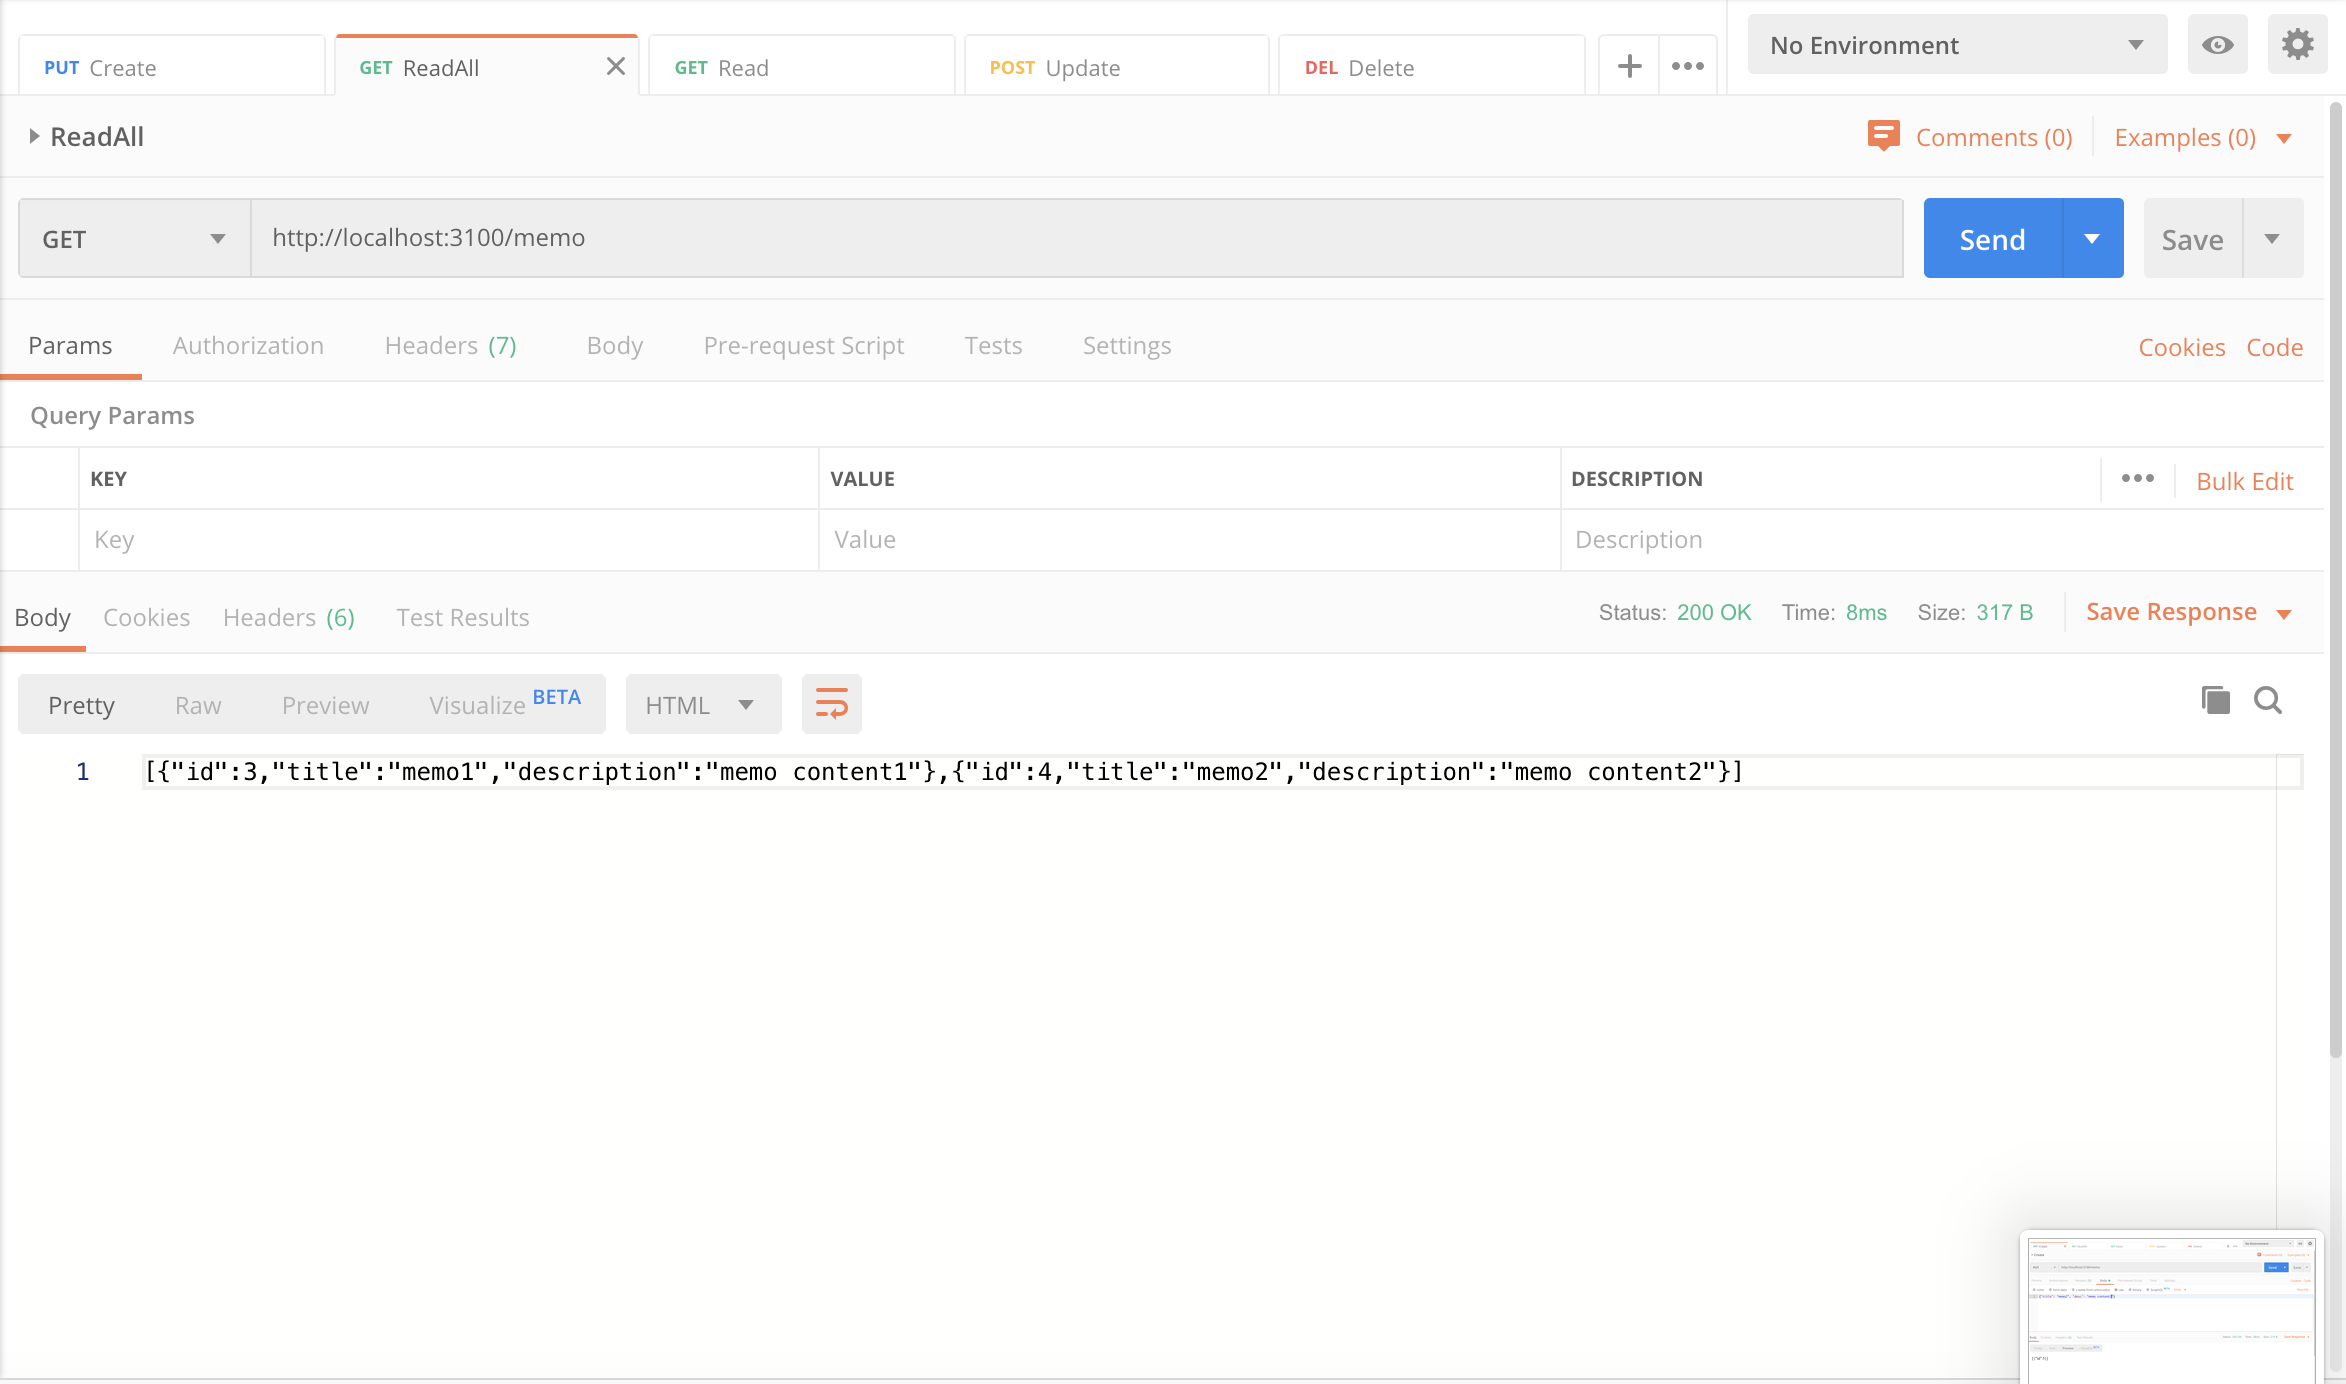
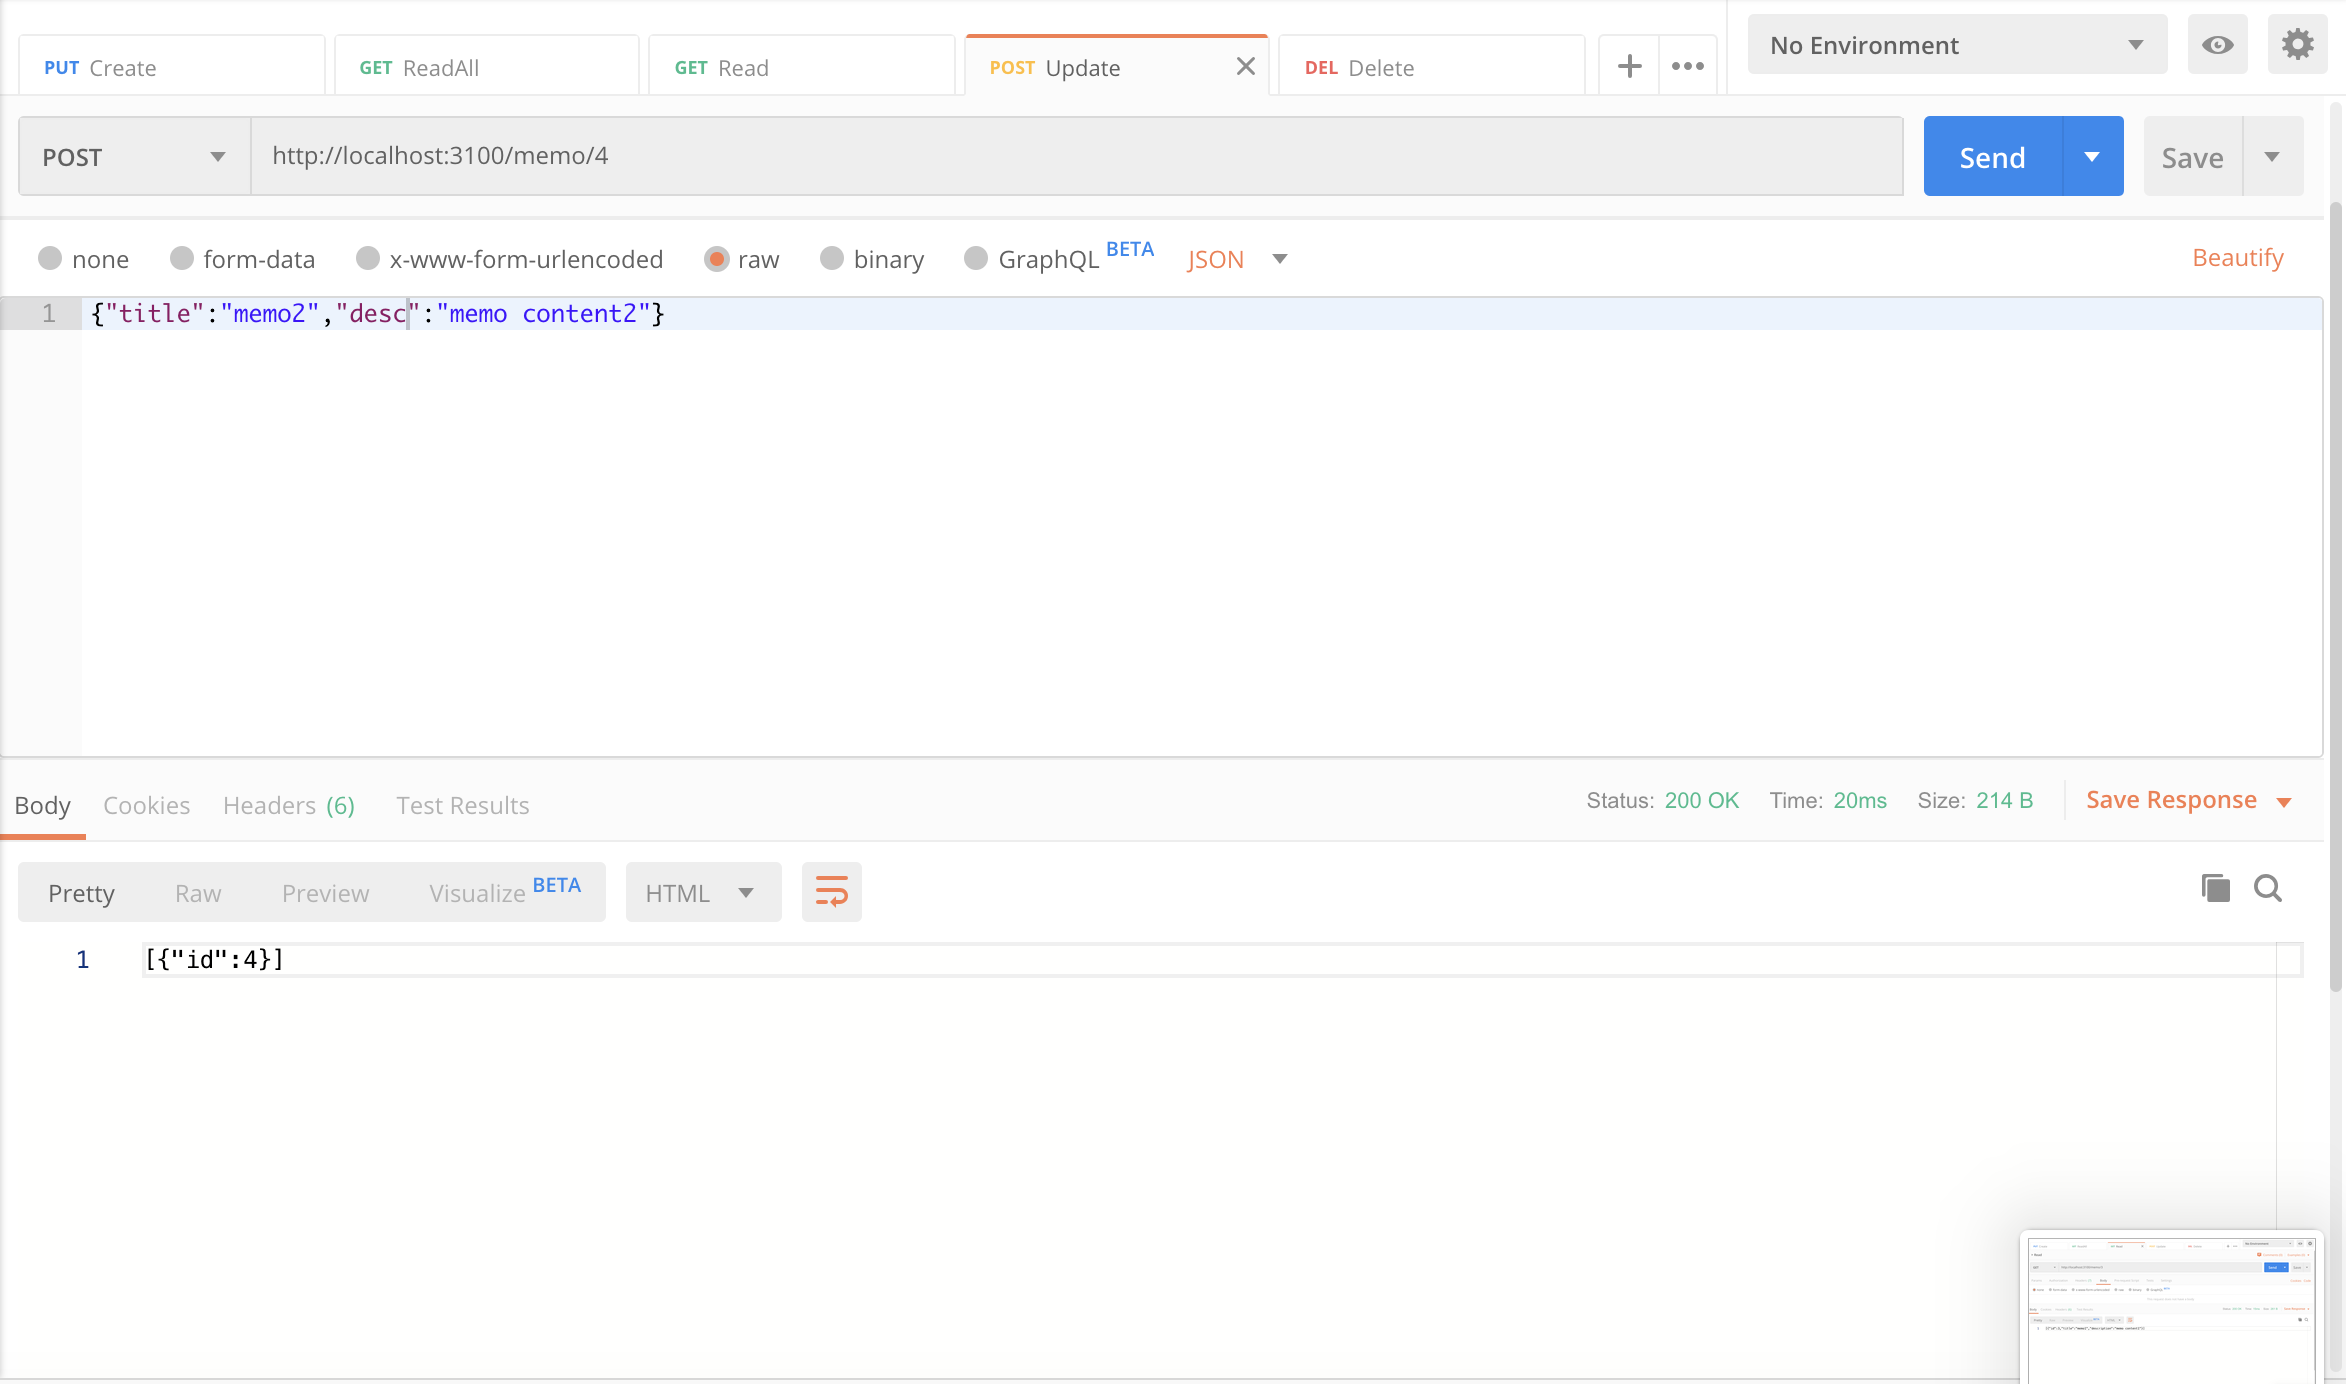
정상적으로 코드가 작성된 경우 결과는 아래와 같습니다.
1. 메모 생성하기

2. 모든 메모 조회하기

3. 특정 메모 조회하기

4. 메모 내용 수정하기

5. 메모 내용 삭제하기

'개발 > node.js' 카테고리의 다른 글
| 2. rabbitmq를 이용한 작업 큐 구현 (0) | 2020.01.15 |
|---|---|
| 1. node.js로 rabbitmq 쓰기 - Send & Receive (0) | 2020.01.15 |
| Expressjs 에서 static file 경로 설정 (0) | 2020.01.11 |
| 크롬 개발자도구에서 node.js 서비스 메모리, CPU 프로파일링 하기 (0) | 2020.01.10 |
| Expressjs 에서 JSON Request Body 파싱하기 (1) | 2020.01.10 |

